
The short answer
A millwork drawing set is the package a joiner or fabricator uses to price, prepare shop drawings and build custom furniture and built-ins. A complete set has a cover and index with general notes, a key plan locating every coded piece, then for each item a plan, elevations of every visible face, sections through each change in construction and enlarged details at 1:5 to 1:1, plus a materials and hardware schedule. Dimension to finished faces, mark which dimensions are critical, coordinate every socket, light and appliance, and use the same item and finish codes on every sheet. If two workshops would price it the same way, the set is complete.
What a millwork set is for
 Open template
Millwork drawings sit between your design intent and the joiner's shop drawings. They are not fabrication drawings: the workshop will decide board cuts, joints and fixings and draw those itself. Your set has to fix everything the workshop must not decide on its own: overall sizes, proportions, door and drawer layout, visible materials and edges, gaps and reveals, hardware function, services and how the piece meets the building. A useful test: if two different workshops would price exactly the same object from your drawings, the set is complete. If quotes come back full of exclusions, assumptions and provisional sums, the set was under-described.
Think of the set as three documents at once. It is a pricing document for the contractor or joiner, so quantities and quality must be clear. It is a coordination document for the electrician, plumber, lighting designer and appliance supplier, who need positions and heights. And it is a record of what you agreed with the client, so when a finish or a handle changes, the drawing shows the revision and the date.
State the quality level you expect. In North America many specifications refer to the Architectural Woodwork Standards, which define Economy, Custom and Premium grades; in Europe the joiner's own standard, the relevant EN product standards and your written specification do the same job. Whatever the reference, write it in the general notes: it changes tolerances, veneer matching, edge treatment and, above all, price.

Issue the set with a clear purpose in the title block: for information, for tender, or for construction. Joiners price a tender set with risk margins; a set issued for construction is the one their shop drawings must follow.
The sheet order that works
 Open template
Joiners and estimators read a set front to back. Order it so each sheet answers the question the previous one raises, from the whole project down to the smallest junction:
- Cover sheet: project name and address, client, studio, issue purpose (for tender, for construction), date and current revision.
- Index and general notes: sheet list with revisions, abbreviations, the quality standard, default tolerances, default carcass material and thickness, default edge treatment, and what the joiner must site-measure.
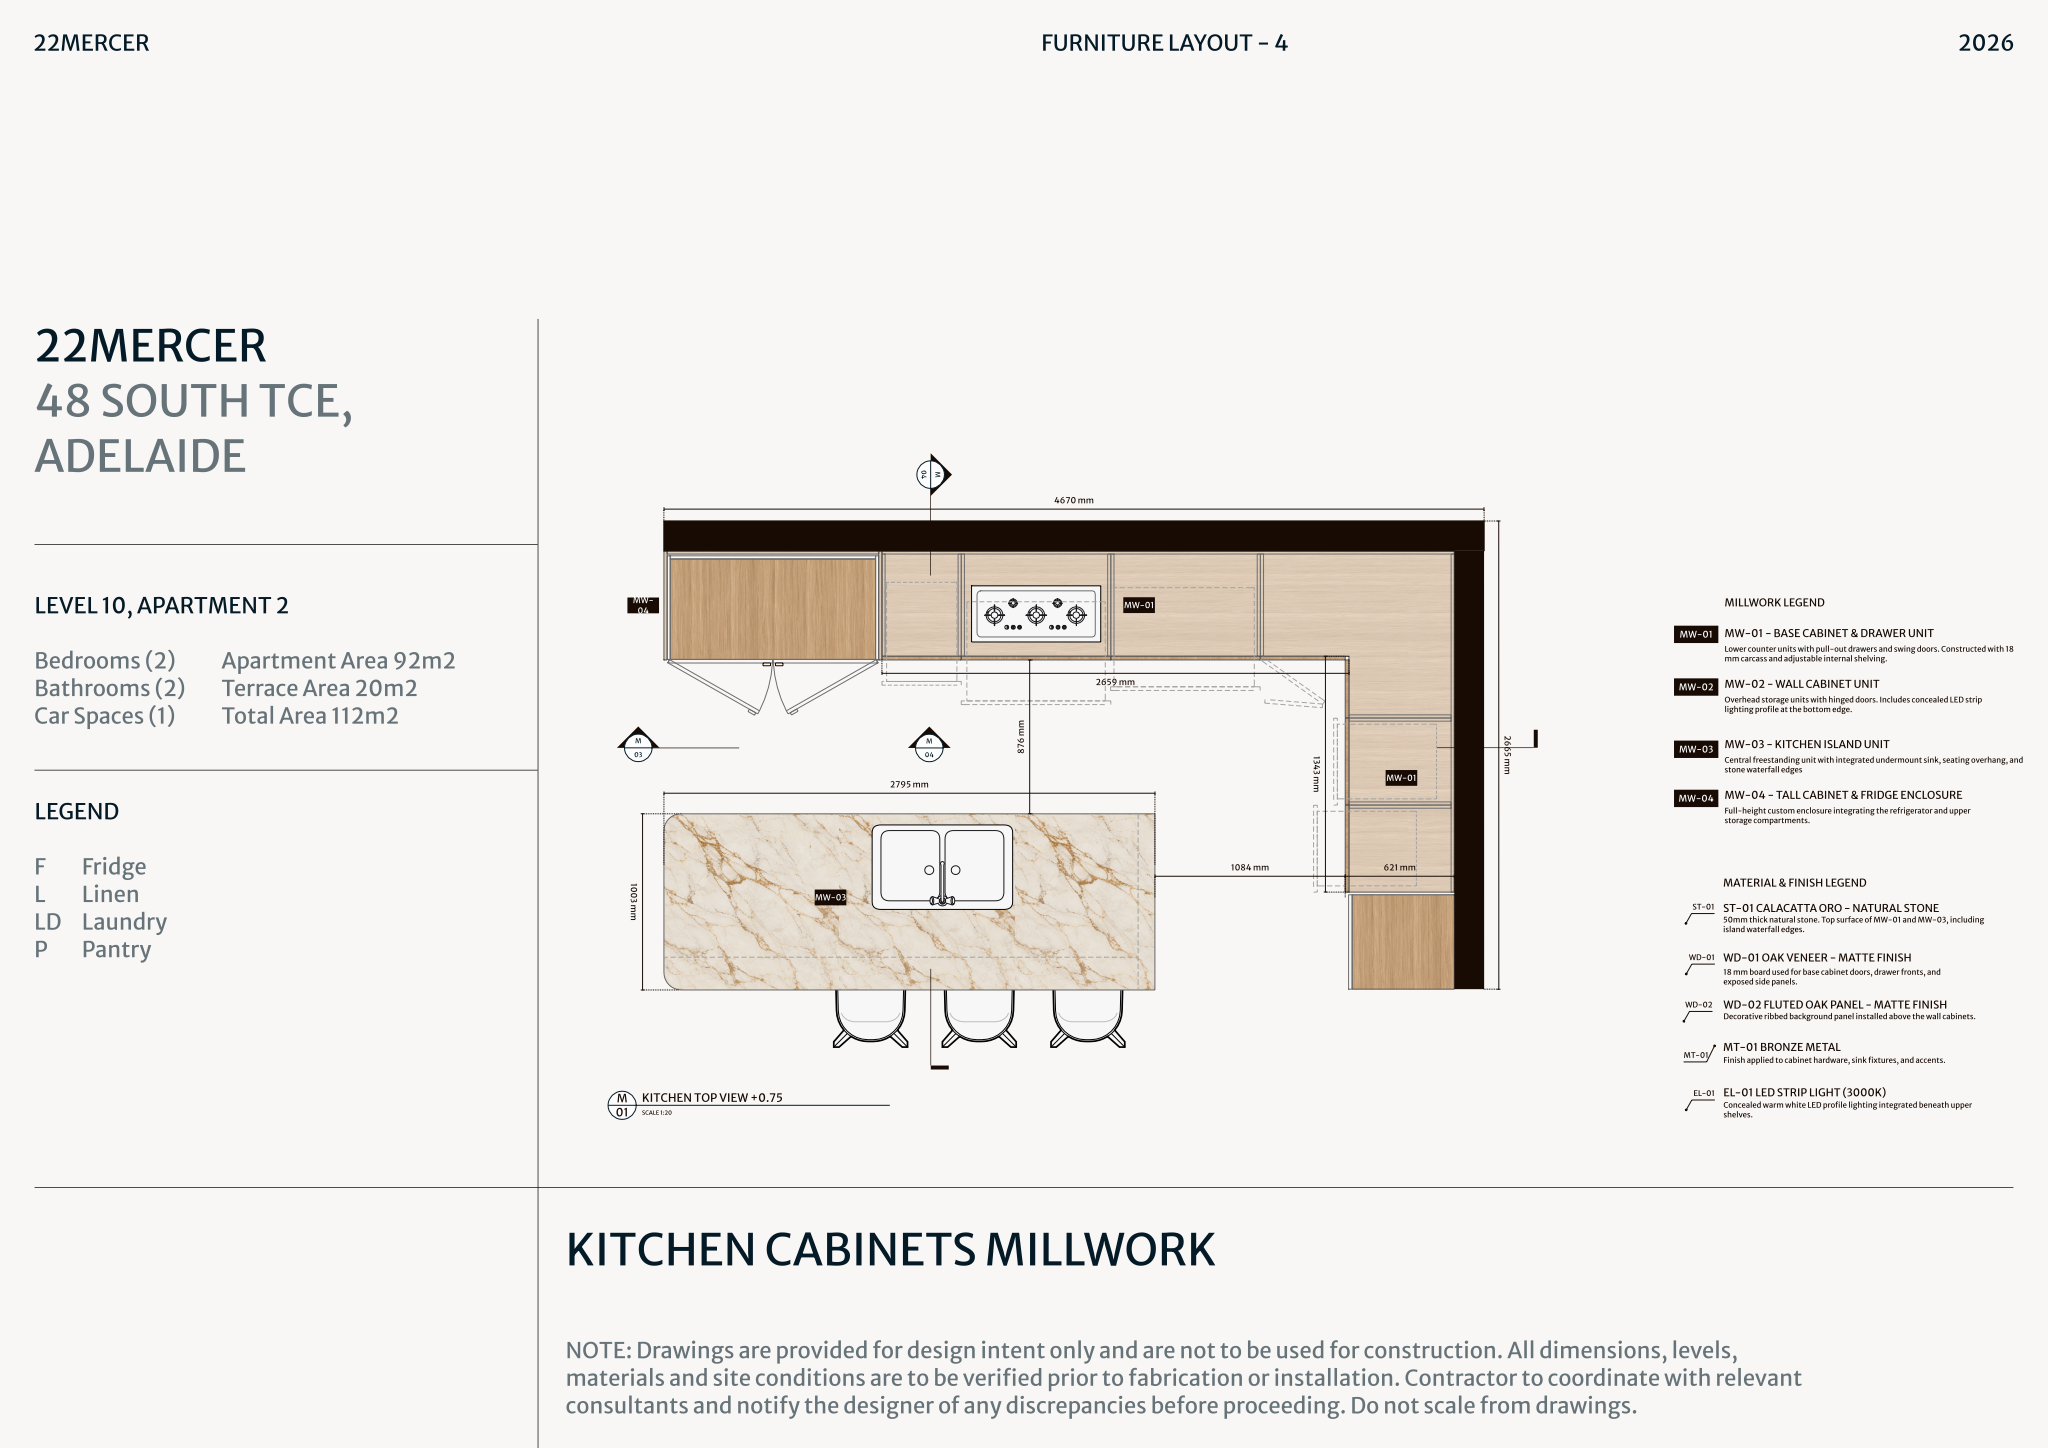
- Key plan: the floor plan with every millwork item tagged with a code (K-01 kitchen run, W-02 wardrobe, R-01 reception desk) and a small legend.
- Item sheets: one or more per tagged piece, each with plan, elevations, sections and details, titled with the item code and room.
- Typical details: standard junctions used across many pieces (plinth, scribe to wall, shadow gap at ceiling, edge profiles), drawn once and referenced everywhere.
- Materials and hardware schedule: every finish code (WD-01, ST-02, LM-03) and fitting (HW-04) referenced on the item sheets, with supplier, reference, finish and quantity.
On large projects, group item sheets by room or by trade package (kitchen, wardrobes, bathrooms, front of house) so each can be tendered separately if needed. Keep sheet numbers stable once issued; add new sheets with suffixes rather than renumbering, or every reference in correspondence becomes wrong.
Give each piece a code on the key plan and repeat it in the sheet title. When the joiner phones about “the bench by the window”, you both open W-03 instead of guessing.
Which views to draw for each piece
 Open template
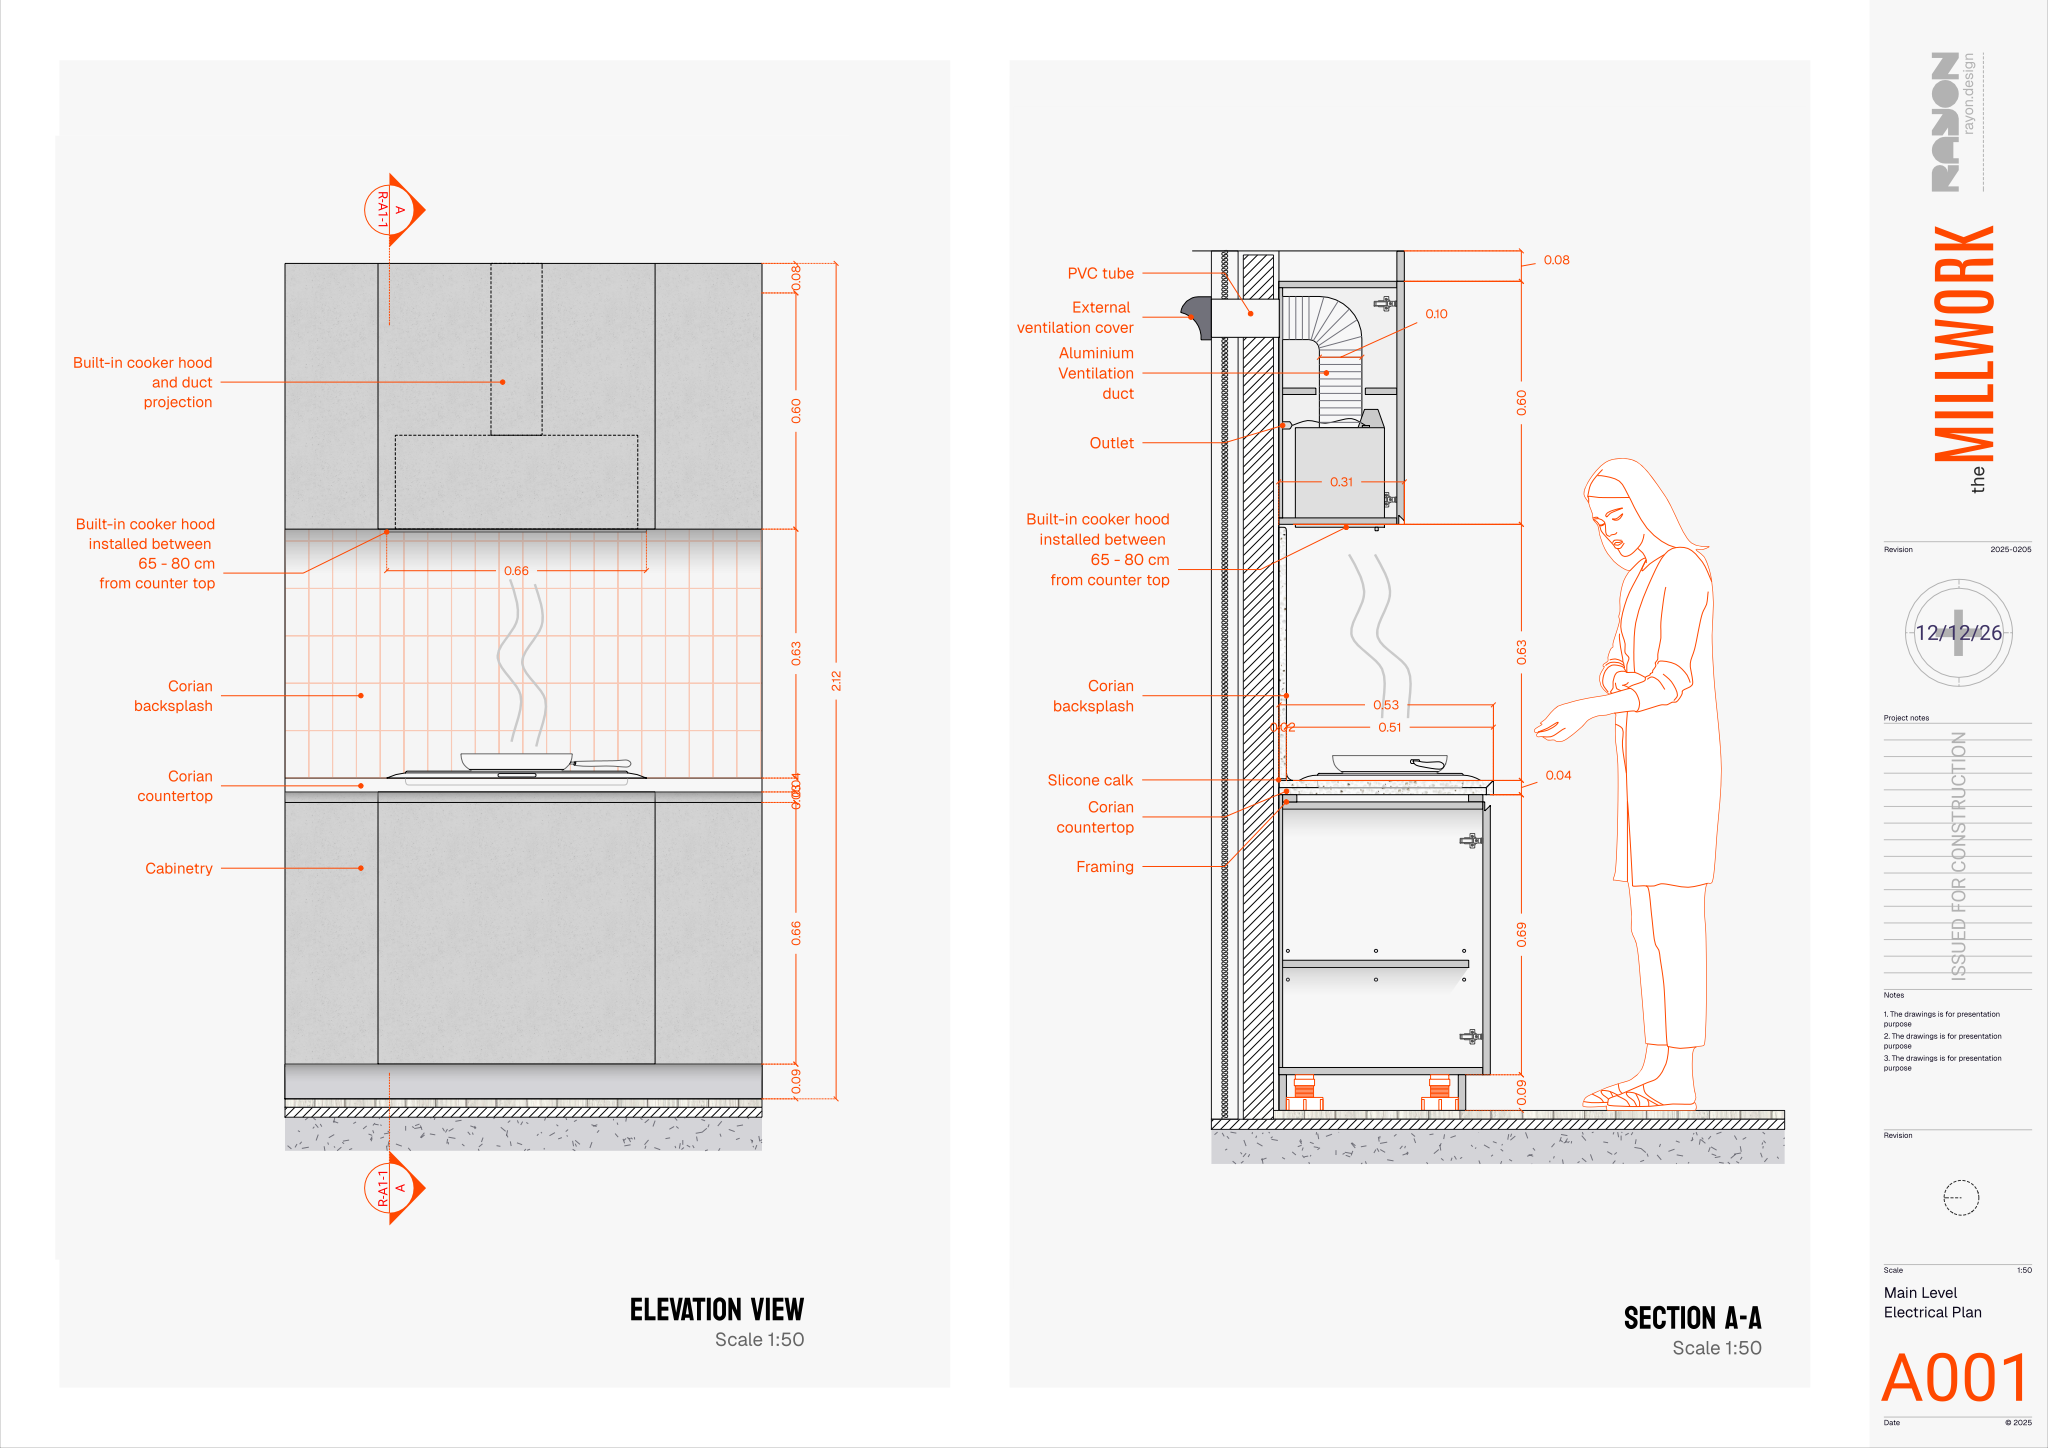
Each piece needs enough views that nobody has to guess what happens out of sight: behind a door, inside a drawer stack, where the worktop meets the wall. Plans and elevations fix the size and appearance, sections explain how the piece is built up and how it meets the building, and enlarged details lock in the few junctions that carry the design. The table below sets out what each view must show and the scale it is usually drawn at.
| View | What it must show | Typical scale |
|---|---|---|
| Plan | Overall footprint and depth, relation to walls and openings, door swings and drawer extension, appliance and sink positions, worktop overhangs | 1:20 (1:25 for large runs) |
| Elevations | Every visible face: door and drawer divisions, shadow gaps, handles or grip profiles, plinth or legs, integrated lighting, sockets and switches | 1:20 |
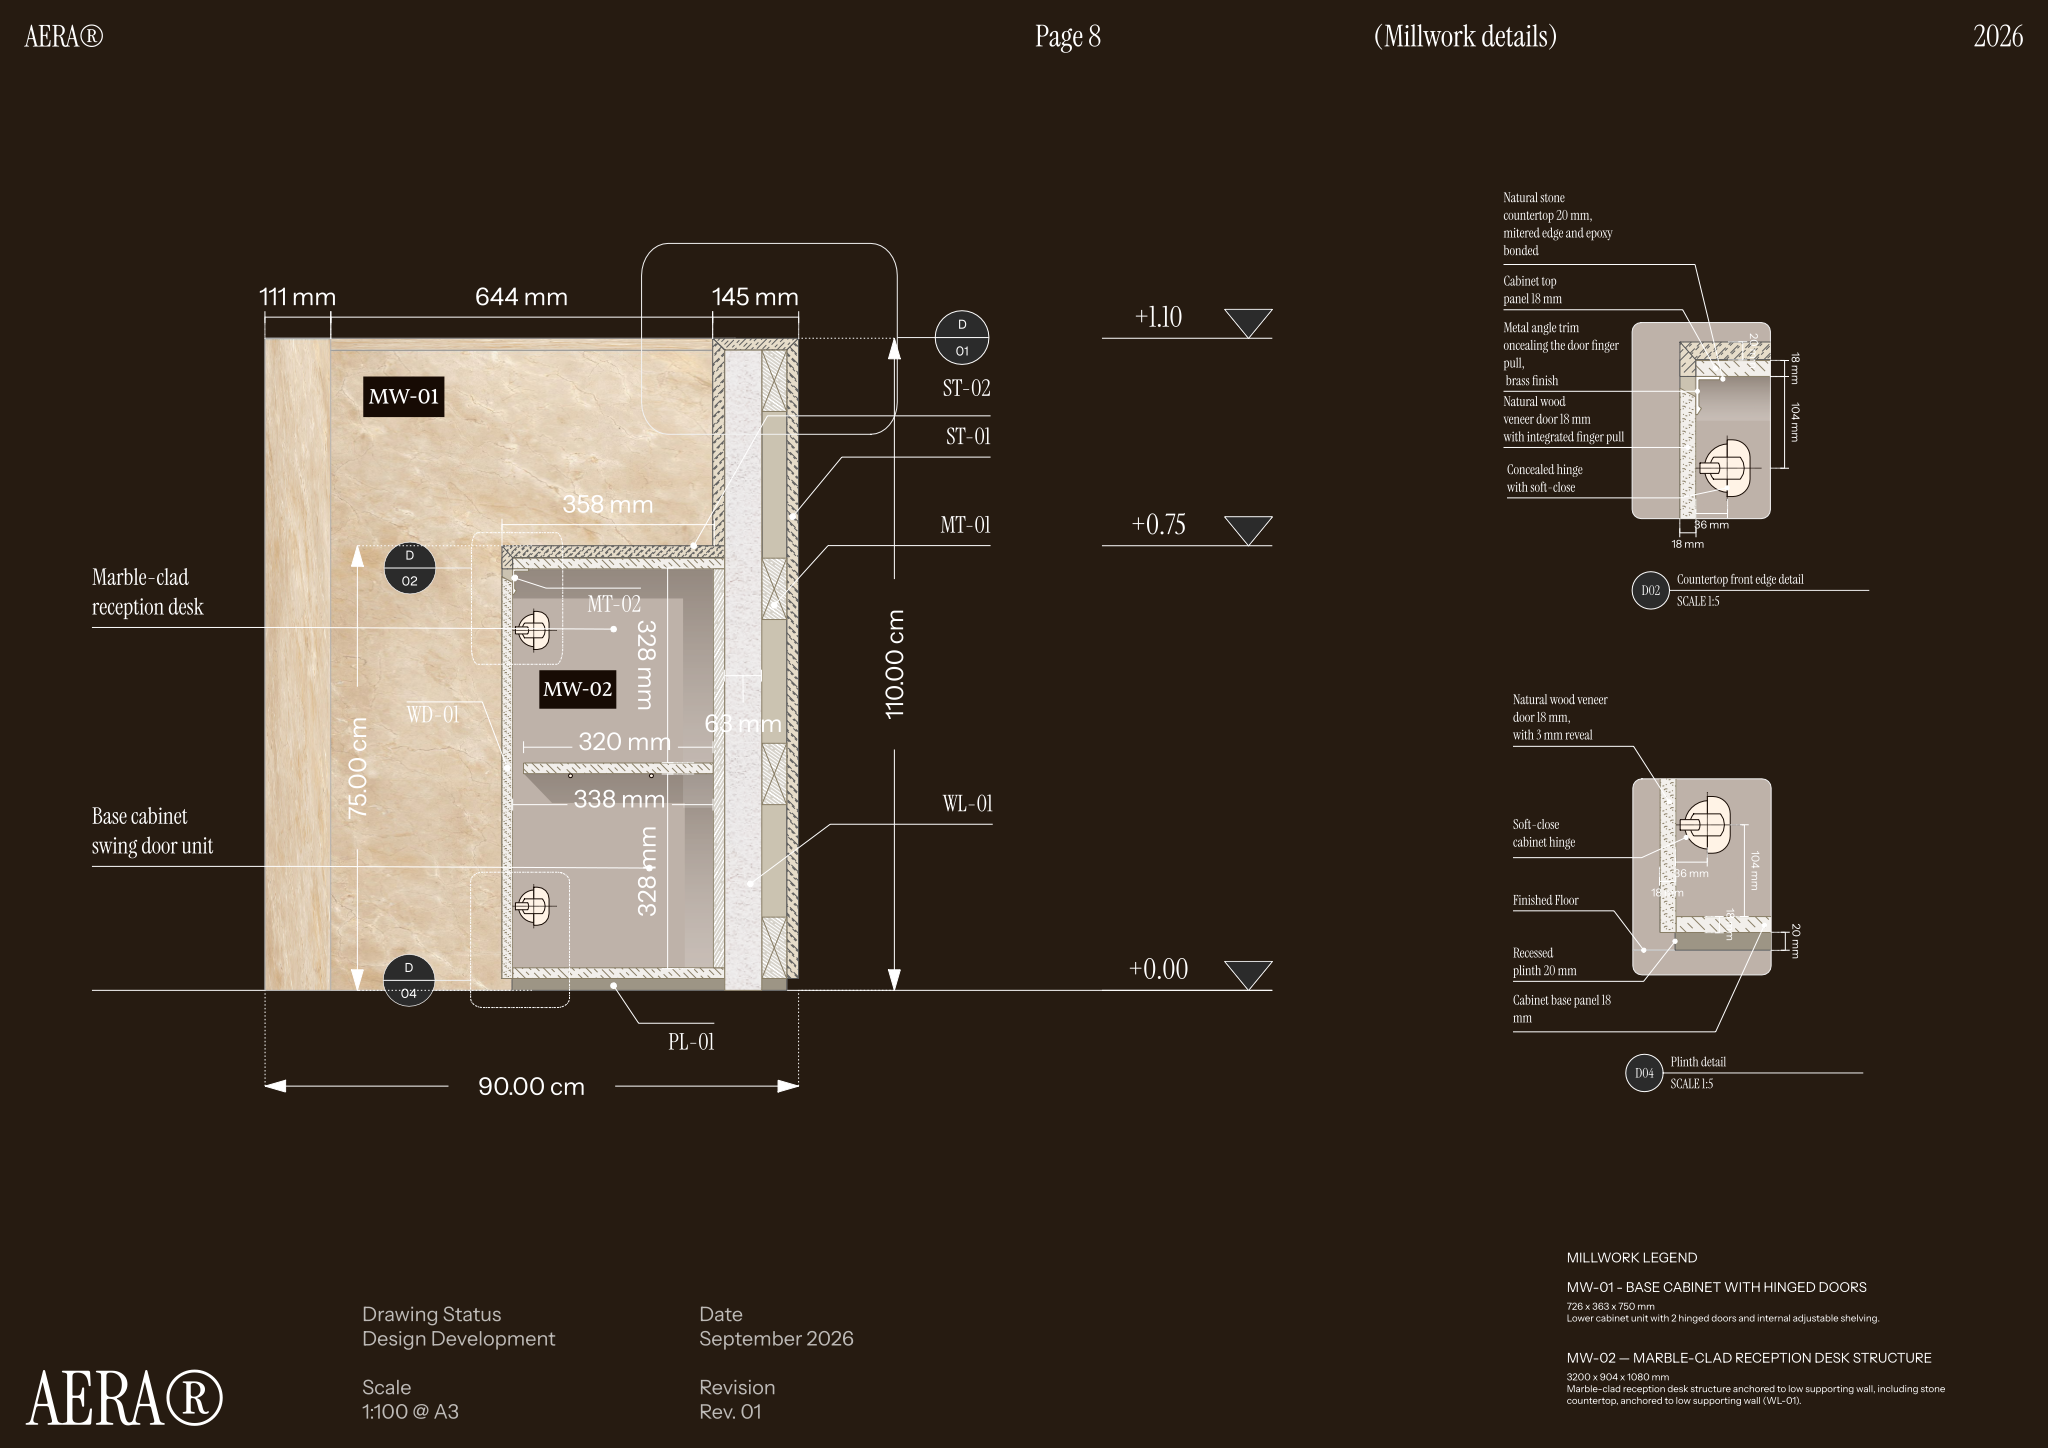
| Sections | Carcass build-up and thicknesses, shelf and drawer positions, worktop and splashback, ceiling, floor and wall junctions, service voids | 1:10 – 1:5 |
| Details | Edge profiles, reveals, scribe allowances, LED channels and diffusers, stone and timber junctions, hidden fixings that affect the look | 1:5 – 1:1 |
| Interior elevations | Wardrobe and cabinet interiors: hanging rails, shelves, drawers, accessories, with heights | 1:20 |
Cut sections where something changes: through a drawer stack, through an open shelf, through an appliance housing, through a sink, and anywhere the piece meets the building (ceiling bulkhead, skirting, window reveal, floor finish). One section through a uniform cabinet run is enough; three or four through a reception desk with a raised transaction top, an accessible lower counter and a cable tray is normal.
Draw elevations with doors closed, and add a second elevation or a dashed overlay with doors open when the interior matters. Show the swing direction of every door and the hinge side, because it changes the hinge order and the handle position. For tall units, show the full height to the ceiling and say whether the gap is closed with a filler, a scribe or a shadow gap.


Dimensioning and annotation
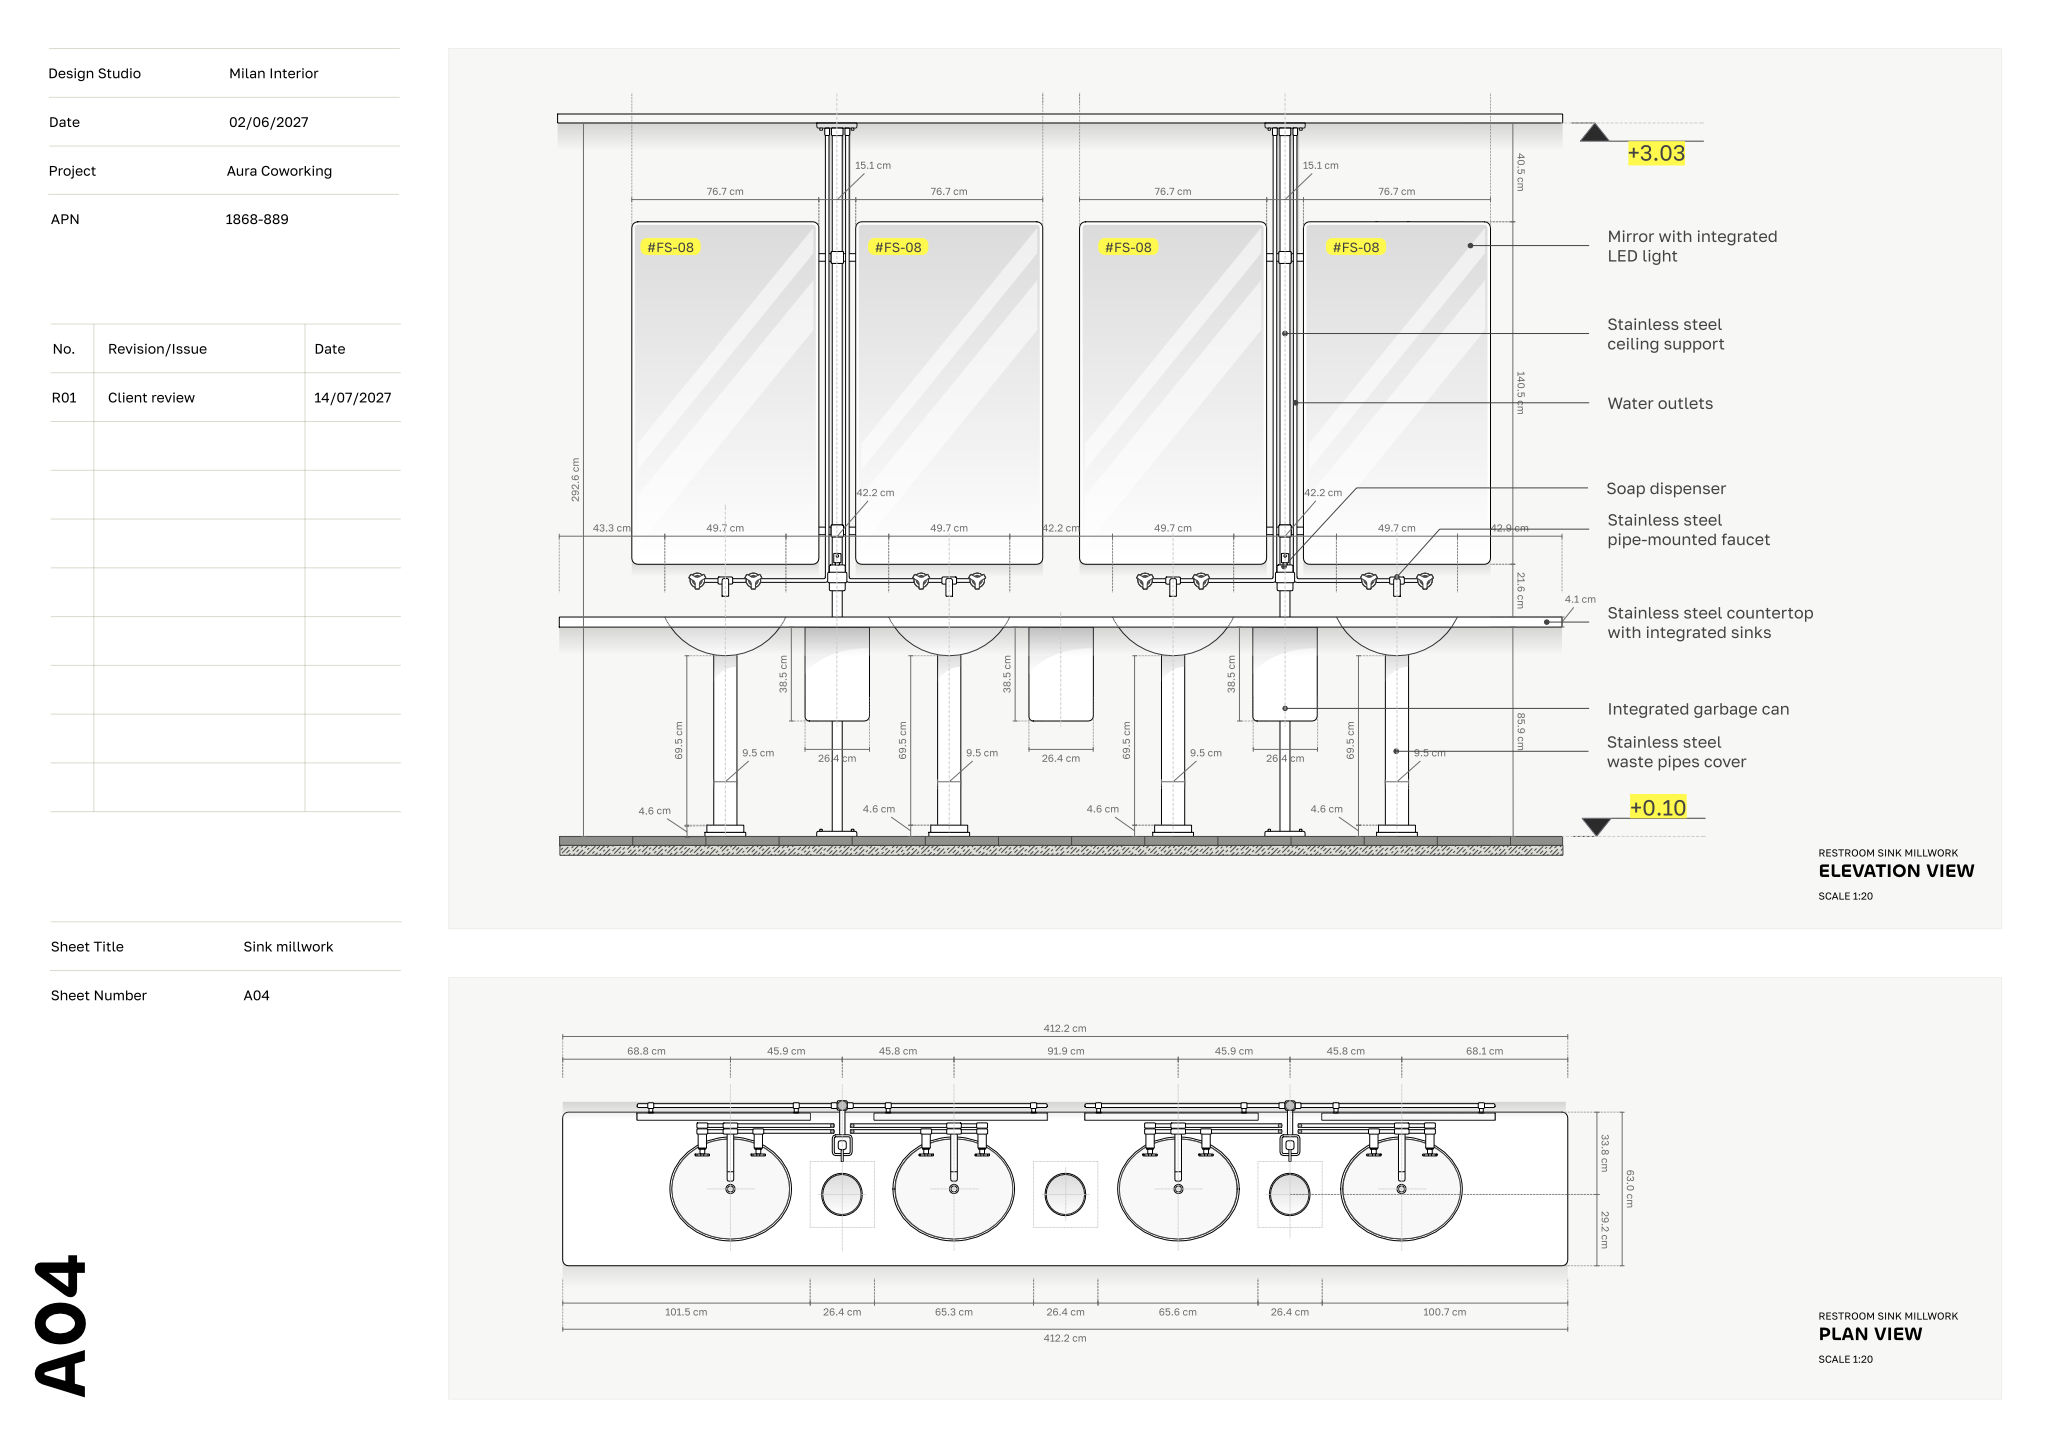 Open template
Dimensions and notes are what a joiner actually prices and builds from, so they need to be complete, consistent and unambiguous. The aim is that nobody on the workshop floor has to scale a drawing or phone you to ask which face a dimension is taken to. The rules below cover most of the questions that otherwise come back as requests for information.
- Dimension to finished faces and say so in the general notes. Mark critical dimensions (appliance openings, accessible counter heights, clearances to doors) and those the joiner may adjust within a tolerance.
- Use three strings: overall, then intermediate (between carcasses or modules), then local (doors, drawers, shelves). A single chain hides errors.
- Give heights from finished floor level (FFL) for worktops, shelves, rails, sockets and lighting, and state the floor finish thickness if the floor is not yet laid.
- Tag materials with schedule codes (WD-01 oak veneer, ST-02 honed marble, LM-01 matt laminate) instead of long descriptions on every view.
- Specify the visible side of every board: veneer grain direction, which faces are finished, and whether internal carcasses match or are a neutral melamine.
- Call out hardware by function (push-to-open, soft-close full-extension runner, lift-up flap, integrated J-pull) and keep brand and model numbers in the schedule.
- Mark services with heights: sockets, data, USB, lighting drivers and their access, water supply and waste, ventilation grilles for fridges and AV equipment.
- Note site conditions: “site measure before fabrication”, scribe allowances against uneven walls, fixing to plasterboard or masonry, and any loads on the wall.
Common working dimensions help you check a design before the joiner does. Kitchen worktops are typically 900–920 mm high and 600–650 mm deep, base units around 560–580 mm deep behind the doors, and wall units 300–350 mm deep, starting 500–600 mm above the worktop. Wardrobes need about 550–600 mm internal depth for hanging, a long-hanging rail around 1600–1700 mm above the floor and a double-hanging arrangement around 1000 mm per rail. Reception and bar counters often combine a 1050–1150 mm high guest-side transaction top with a 720–760 mm high working surface, and an accessible section lower than both. Confirm every figure against the appliances, local codes and the client's actual use.
Shadow gaps and reveals are where design intent is most often lost. Draw them at 1:2 with the actual gap dimension (3, 5 or 10 mm), the finish inside the gap and whether doors are full overlay, half overlay or inset.
Retail, hospitality and workplace millwork
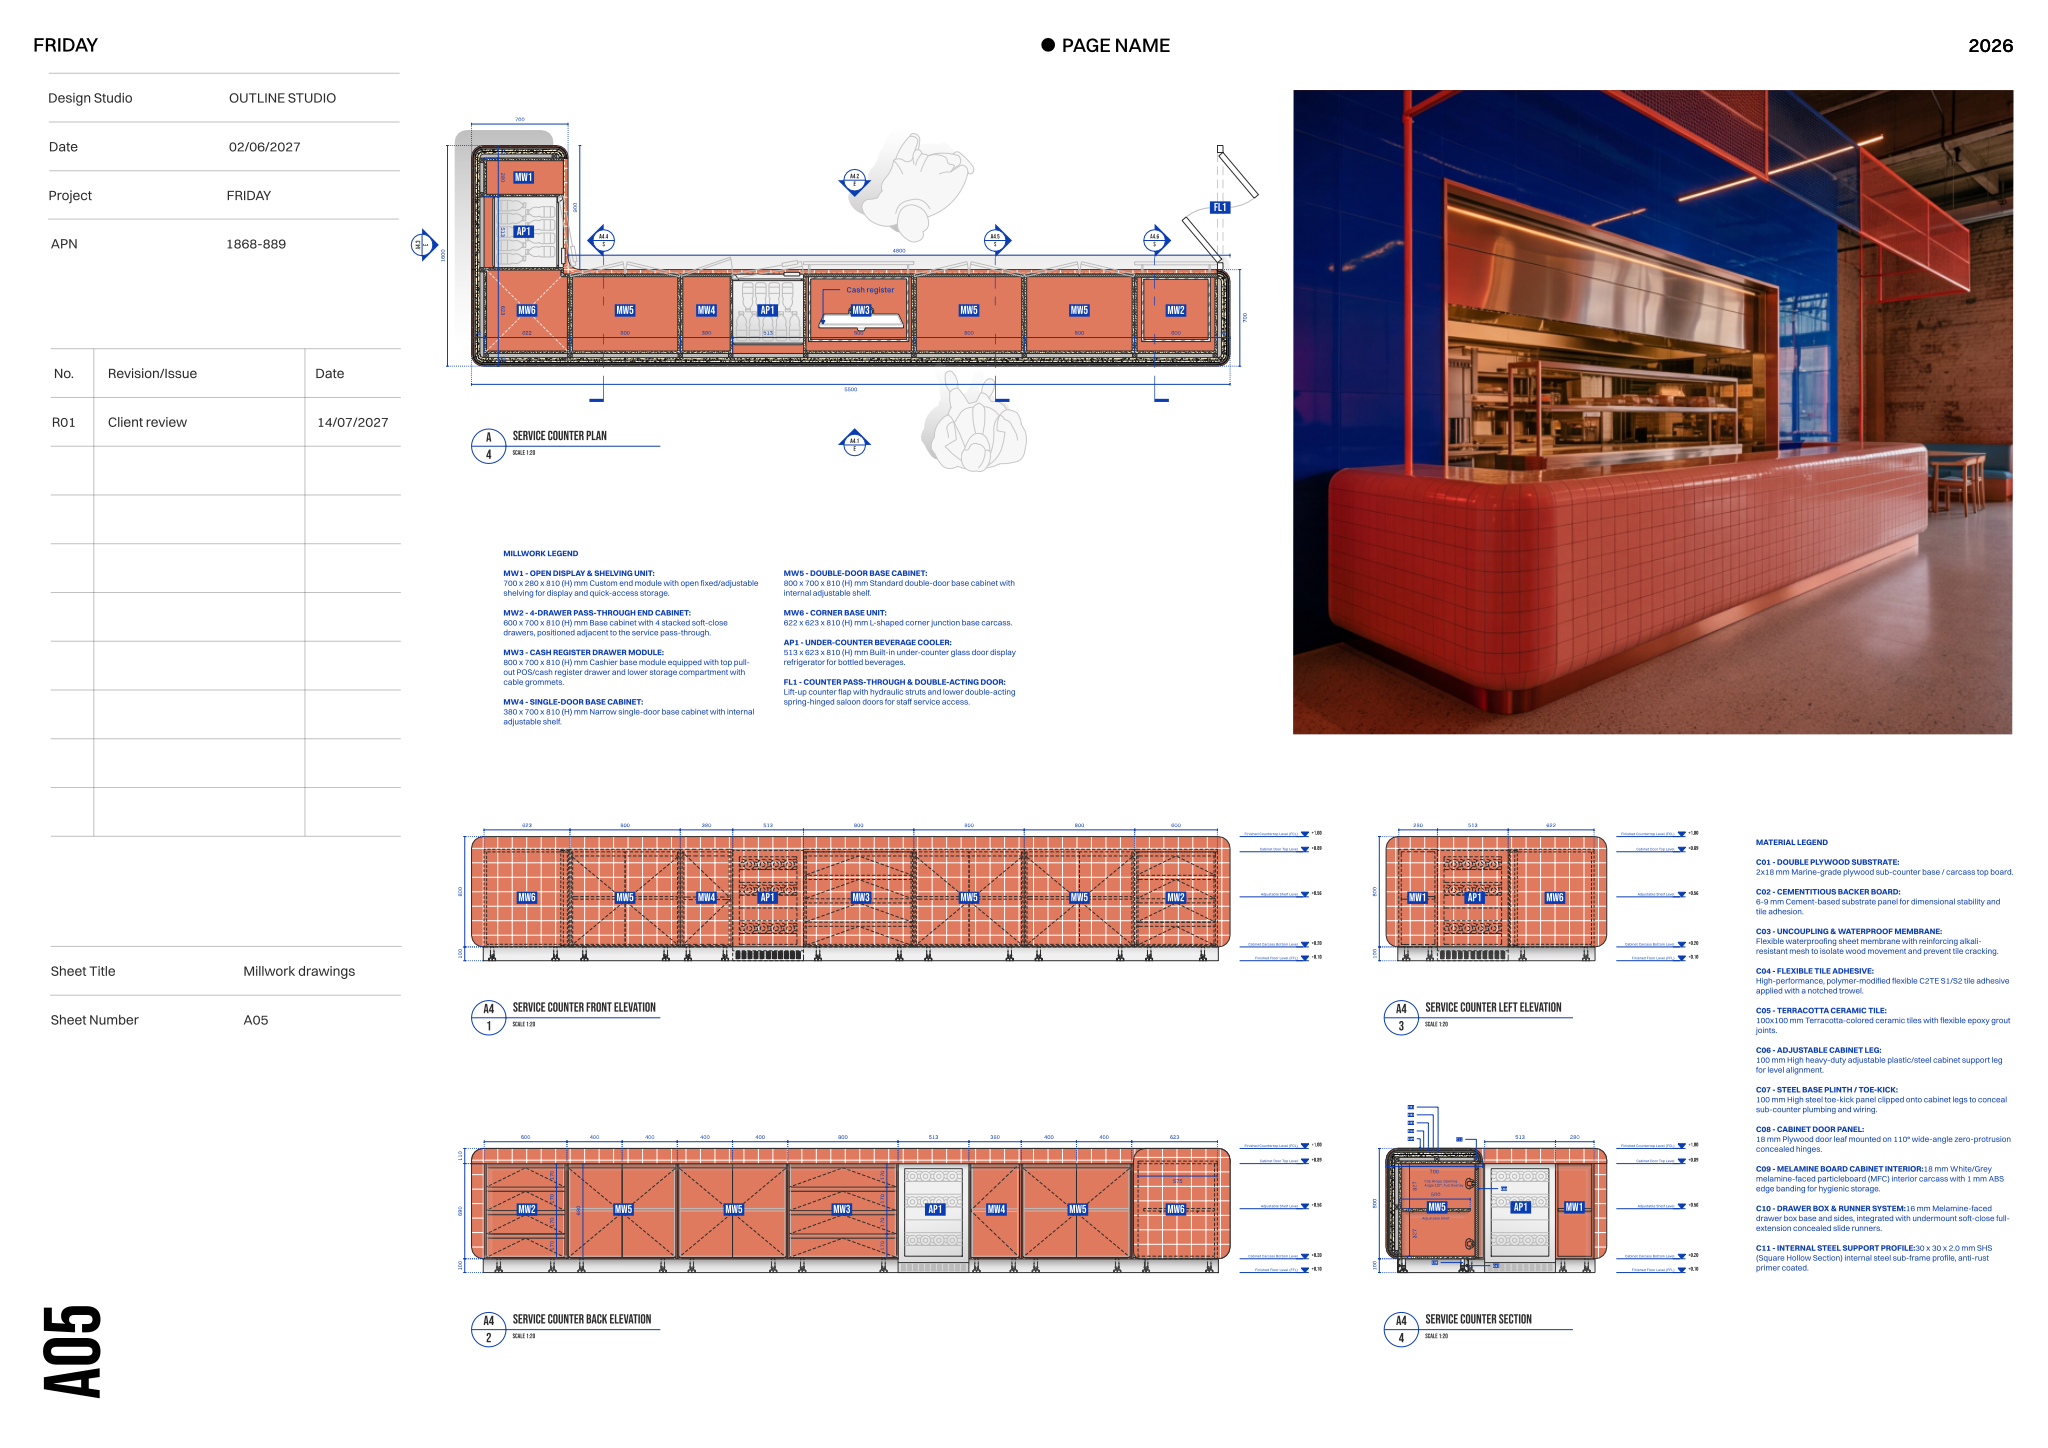 Open template
Commercial millwork adds repeatability, durability and regulation. A restaurant chain or retail roll-out needs pieces that can be built identically across sites, so state the module sizes, the standard components and which elements vary per location (length, number of bays, corner condition). Draw the module once in full, then show each site as a configuration of modules on its own key plan.
- Retail displays: shelf loads (kg per shelf), adjustable shelf pitch, integrated lighting and security, and how fixtures are fixed or moved between seasons.
- Hospitality: moisture-resistant boards and edge sealing in bars, bathrooms and spas, robust finishes on guest-facing edges, and access panels for refrigeration and plumbing.
- Workplace: cable management (grommets, trays, vertical risers), lockers with numbering and lock type, and acoustic panels integrated into joinery.
- Public areas: reaction-to-fire classification of boards and finishes as required by the local code (for example a Euroclass under EN 13501-1), with test certificates requested from the joiner.
- Accessibility: a lowered counter section, knee space, reach ranges and clear floor space in front of service counters, drawn and dimensioned.

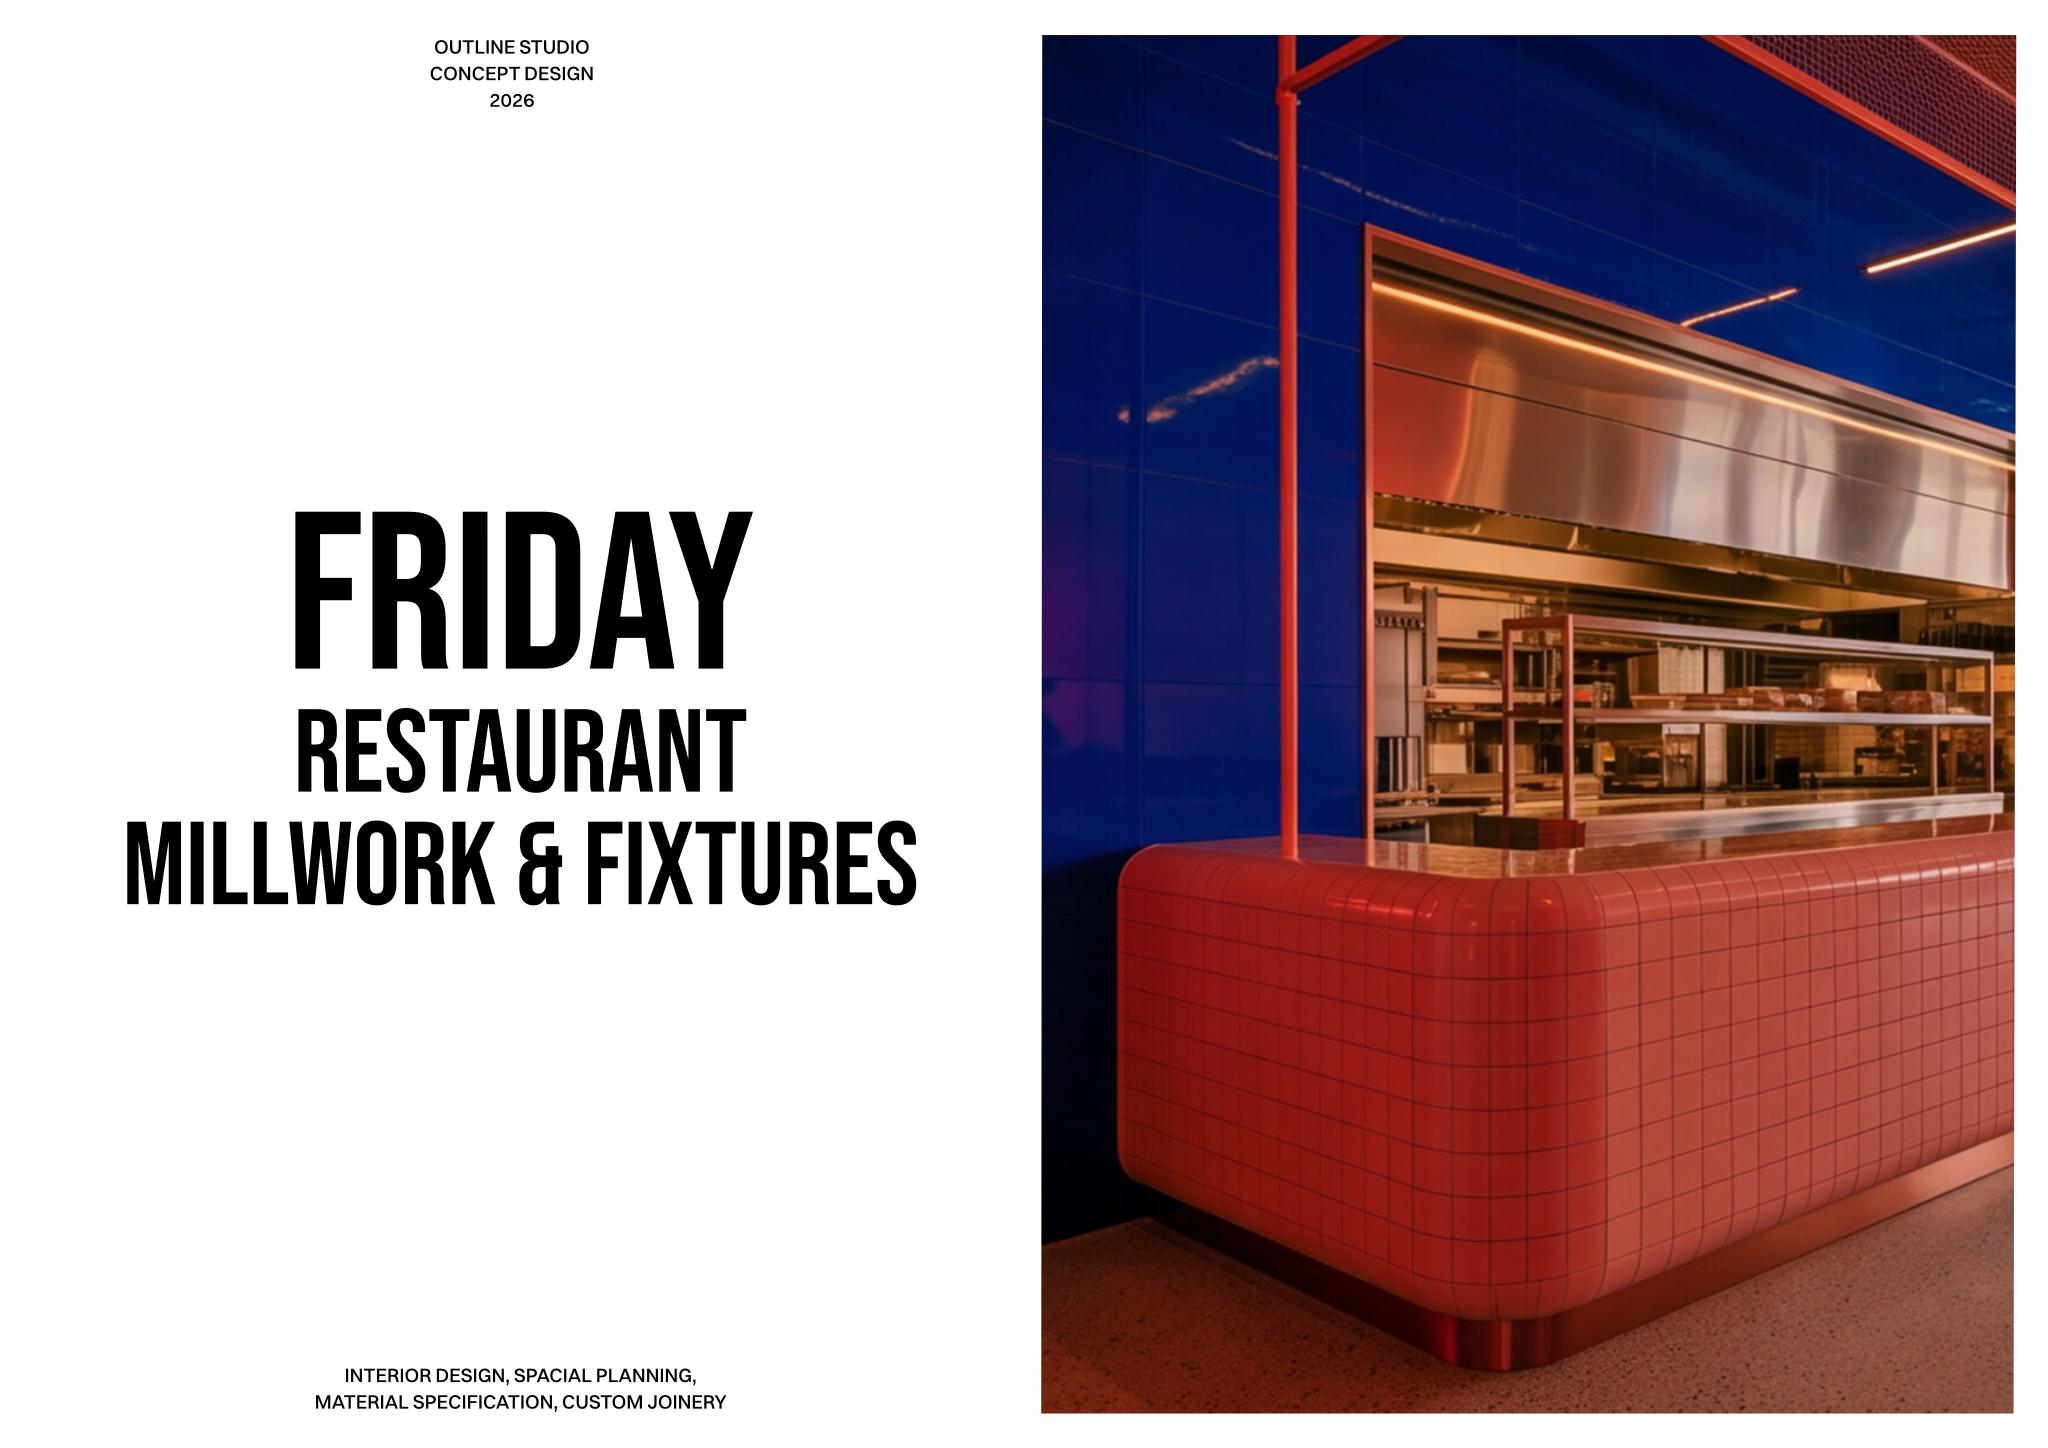


For roll-outs, build a prototype of the most complex piece (usually the counter or a display wall) before releasing the full order. Fixing problems on one unit is cheap; fixing them on thirty is not.
Pre-issue checklist
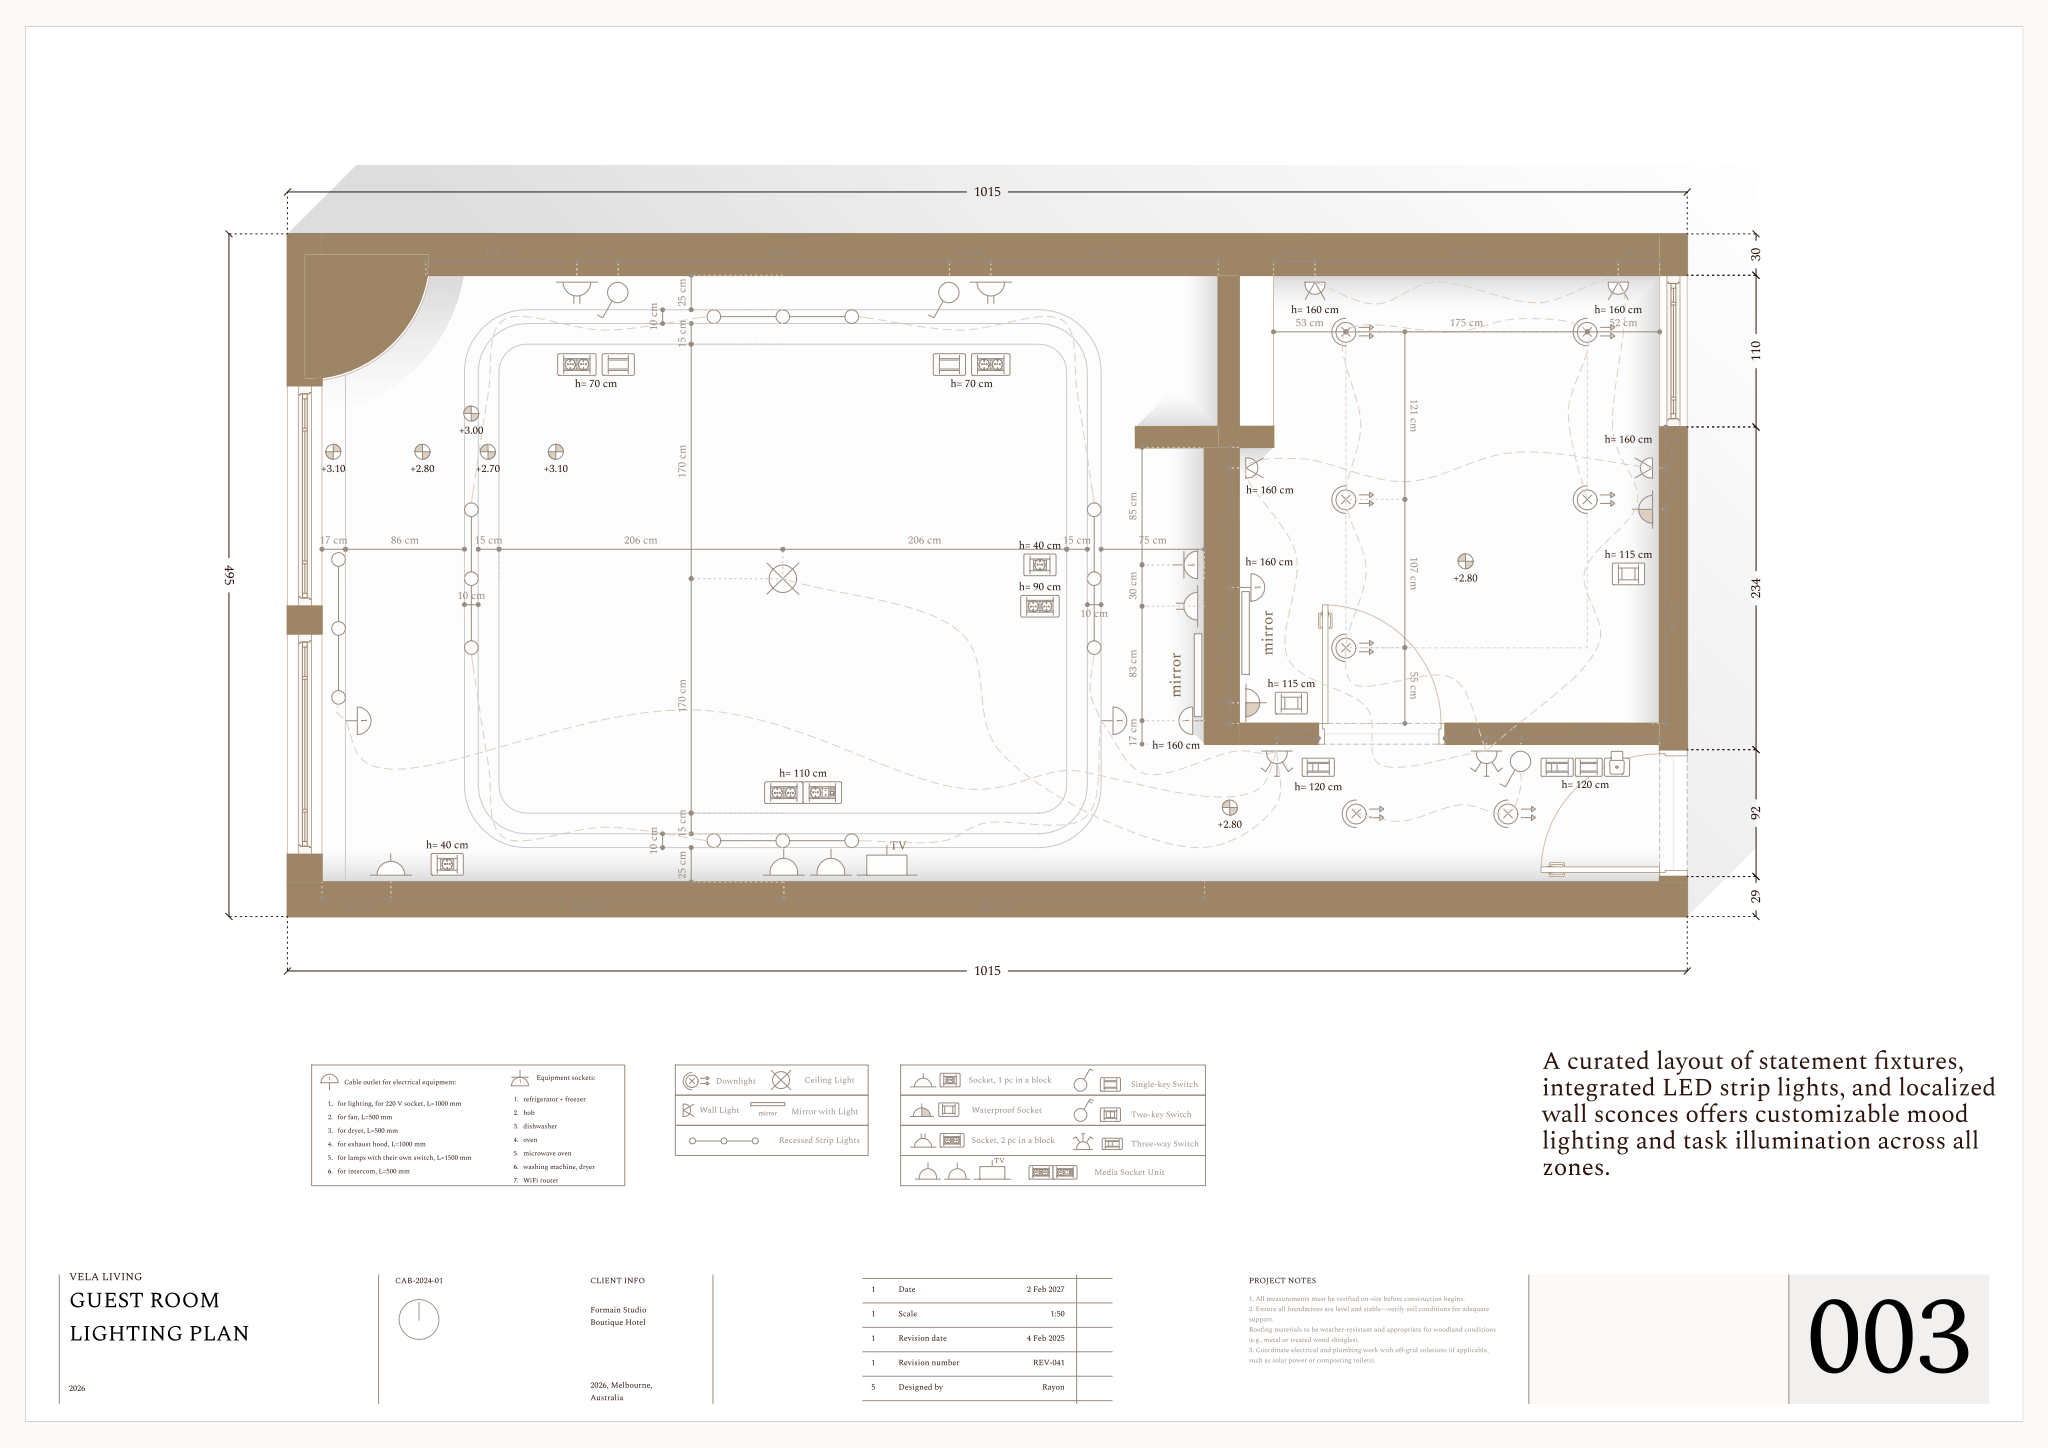 Open template
Most problems with millwork packages come from things that were drawn but not coordinated: a code missing from the schedule, a socket behind a drawer, a door that clashes with a wall. A short, systematic check before each issue catches them while they are still cheap to fix. Run through this list every time the set goes out, not only at the first issue.
- Every item on the key plan has a sheet, and every sheet's item appears on the key plan.
- Every finish and hardware code on the drawings appears in the schedule, and the schedule has no orphan codes.
- Appliance specification sheets checked against openings, ventilation and door clearances; model numbers recorded.
- Sockets, switches, lighting, data, water and waste coordinated with the electrical and plumbing drawings, with heights from FFL.
- Door swings, drawer extensions and appliance doors checked against walls, other doors and circulation in plan.
- Critical and adjustable dimensions marked; site-measure notes in place where walls are not yet built or are out of true.
- Quality standard, tolerances and default materials stated in the general notes.
- Revision clouds and revision table updated, issue purpose stated on every sheet.
- Scales shown on every view and correct when printed at the sheet size (A3 or A4); a scale bar on each sheet for PDF viewing.
- Shop drawing review step written into the notes: no fabrication before your approval of shop drawings and, where relevant, physical samples.
When the shop drawings come back, review them against your set rather than re-reading them from scratch: check codes, overall sizes, gaps, hardware and services first, then construction. Mark comments as approved, approved with comments, or revise and resubmit, and keep the returned set on file as the agreed record.
Watch it on Rayon Academy
Common questions
What scale should millwork drawings be?
Plans and elevations are usually drawn at 1:20, sections at 1:10 or 1:5, and edge or junction details at 1:5, 1:2 or 1:1. Choose scales that read clearly at the paper size you issue on, and add a scale bar so the PDF can still be measured when printed at a different size.
What's the difference between millwork drawings and shop drawings?
Your millwork drawings describe design intent: sizes, appearance, materials, hardware function and coordination. Shop drawings are prepared by the joiner from yours, with construction methods, board cuts, joints and fixings, and come back to you for approval before fabrication starts.
A3 or A4 for a millwork set?
A3 gives room for a plan, elevation and section on one sheet, which joiners prefer because they can read a piece without flipping pages. A4 suits smaller pieces and residential packages printed in the office. Rayon has templates in both formats.
Should I dimension to the carcass or to the finished face?
To the finished face, and say so in the general notes. The joiner knows the board and edging thicknesses they will use; you know the size the space and the client need.
What is a scribe in millwork?
A scribe is a strip or allowance at the edge of a piece that the installer cuts on site to follow an uneven wall, floor or ceiling. Show where scribes are allowed and how wide they may be, usually 10 to 25 mm, so the finished piece still looks intended.
Who is responsible for coordinating services in millwork?
You are responsible for showing where services go in the design; the electrician and plumber install them; the joiner builds the openings and access panels. Put positions and heights on the millwork drawings and cross-check them with the electrical and plumbing drawings before issue.